The main topic of this worksheet is recursion with backtracking, building on the maze-solving example from lecture.
These things might be helpful while working on the problems. Remember that for worksheets, we don't strictly limit what resources you can consult, so these are only suggestions.
maze.py¶This problem involves reading and learning more about the module maze we discussed in Lecture 15. You'll use the things you learn about here in subsequent problems.
In Lecture 11 we discussed a minimal way of using the module:
Maze object (e.g. with M = maze.Maze(xsize=7,ysize=7)M.set_blocked for individual squares, and/or M.apply_border which makes all of the edge squares blocked)M.start and M.goal) locationsThe module maze has several other features:
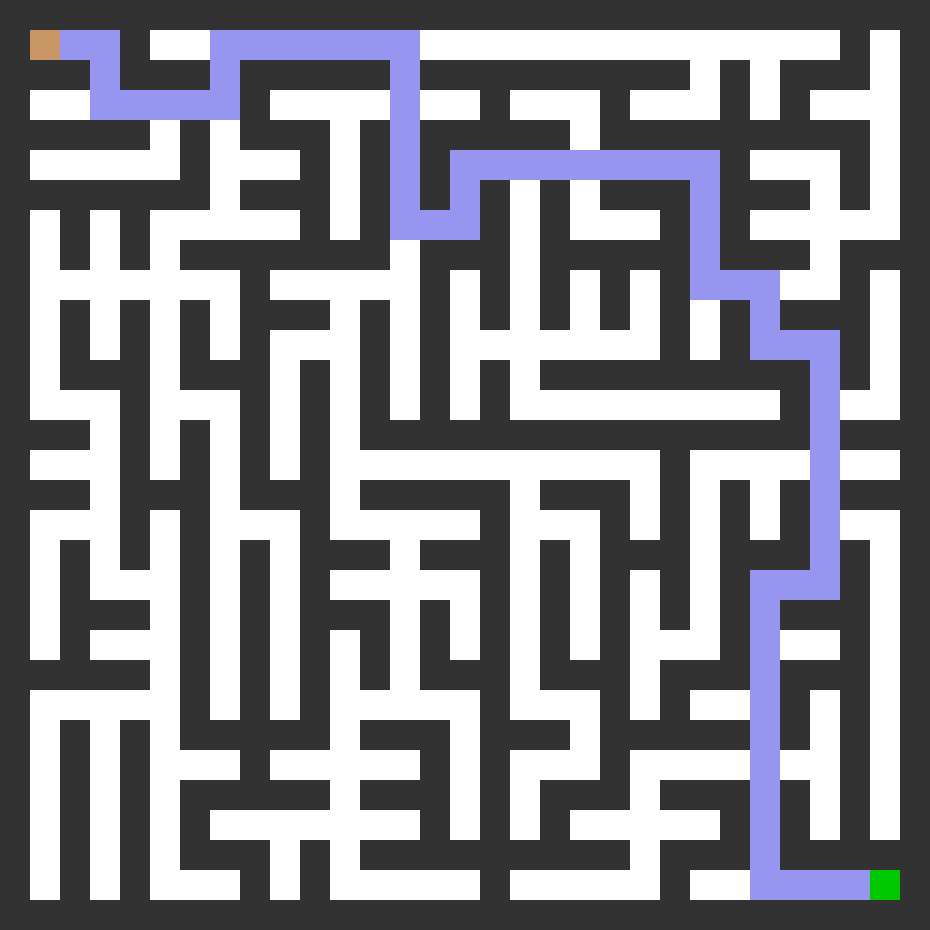
Maze objects have a method save_svg(filename) that writes a graphical representation of the maze to a file in the SVG format. This is a vector graphics format (scalable, not pixel-based) that can be viewed in most web browsers.
This method also accepts an optional argument highlight, which if given should be a list of (x,y) pairs that indicate squares in the maze that should be higlighted in light blue. For example,
mymaze.save_svg("cool.svg",highlight=[ Point2(2,1), Point2(3,1), Point2(4,1) ])will save the maze to cool.svg, and highlight three squares in blue. (This assumes you've already run from plane import Point2 to get the Point2 class.)
The highlight argument is provided as a way to indicate the solution of a maze, or any other feature you might choose to display.
For this feature, you need to install a module that isn't in Python's standard library. The module PIL is from a package called Pillow, and is used to work with image files. The following command should install it:
python3 -m pip install pillowAfter installing Pillow, you can save a maze object as a PNG file (a bitmap graphics format supported by nearly every program that deals with images) using the save_png method. Its arguments are:
save_png(filename,scale=1,highlight=[])The argument scale is a positive integer controlling the width of each maze square in pixels. The default, scale=1, will result in a tiny image file where each pixel is a maze square. To get a reasonable size output image, try scale=10 or scale=30.
The class PrimRandomMaze inherits from Maze and automatically generates a random maze that has exactly one path from the start to the goal. Its constructor takes only two arguments
PrimRandomMaze(xsize,ysize)and both xsize and ysize must be odd numbers. This random maze generator uses Prim's algorithm, which is known for producing mazes of moderate difficulty, with many short dead ends.
Upgrade the script part of solvemaze so it does the following:
127x127n and us it as both xsize and ysizexsize and the second as ysizemaze127x127.svg)Test the program, loading the SVG file it produces in a web browser.
Also try the same but with a PNG file as the output image type. You may need to adjust the scale keyword argument of save_png to make an image large enough to easily see.
If everything works, your images should look a bit like this.
Add a new function depth_first_maze_solution_history() to solvemaze.py that works similarly to depth_first_maze_solution() but which returns a list of every path considered (rather than just a single path that is a solution). Thus the last item in the returned list will be a solution, if a solution exists.
Then, write a script that uses depth_first_maze_solution_history to do the following:
nn by n mazedfs001.png, dfs002.png, etc., that highlight the paths considered by the solverRun this on a maze of moderate size (e.g. 9x9) and flip through the resulting images in your platform's image viewer to make a crude animation of the recursive process.
Instead of using the PrimRandomMaze class to generate a maze, write your own subclass of Maze that creates a maze in which start and goal are set, the border is fully blocked, and so that it is possible to get from start to goal. The constructor should create some obstacles between the start and goal, to make the maze more interesting.
For example, you might make a class that simply places a large rectangle of blocked squares in the middle of the maze, so that a solution must either go along the top and right, or bottom and left. Or you might make some walls coming out of the sides, so that a solution needs to turn back and forth several times. Or you could make the start at the center, and surround it by walls that force any solution to take a spiral path out to a goal on the edge.
The key characteristics you are looking for are:
It's OK for the constructor to decide a size is too small or is otherwise unacceptable, and raise an exception. But to keep things interesting, it should allow arbitrarily large mazes.
Write a script that instantiates your class and then uses solvemaze to find a solution. Save the solved maze to a SVG file.
The version of depth_first_maze_solution we developed always considers its next possible steps in the order returned by Maze.free_neighbors, which in turn is dictated by the class attribute neighbor_disps of class Maze. This always tries movement vectors in the following order: [Vector2(-1, 0), Vector2(0, -1), Vector2(1, 0), Vector2(0, 1)]
This means that for mazes with multiple solutions, depth_first_maze_solution will always find the same solution and will do so by exhibiting a preference for moving in direction Vector(-1,0) whenever it is possible to do so, reverting to Vector2(0,-1) only when a dead end is reached, and so on.
Modify depth_first_maze_solution so that it has an additional keyword argument called strategy which defaults to the string "fixed". Depending on the value of strategy it will consider possible next steps in a different order:
strategy is "fixed", it uses the order provided by Maze.free_neighbors. That's what depth_first_maze_solution developed in lecture does.strategy is "random", it considers the possible next steps provided by Maze.free_neighbors in a random order (see e.g. random.shuffle in Python's random module). Thus, the solution found may vary from one call to the next, if the maze has multiple solutions.strategy is "closest", then among all possible next steps, it tries them in order of increasing Euclidean distance to the goal. That is, the first step it tries is the one that has the smallest distance to the goal among available steps. Then it moves to the second-smallest distance, etc.Try these strategies on a maze that is wide open, having only walls on the edges, to compare their behavior.